

How To Cut A Triangle Out Of Wood
3 Ways to Cut Timber
Making accurate foursquare (90-caste) and mitered (angled) cuts in timber is an essential skill when making joints in article of furniture and to a lesser degree in building construction. Even if you don't try whatever serious DIY, the need sometimes arises to cut a length of timber reasonably accurately. For example, architrave may need to be cut around a window or doorway, skirtboards (baseboards) at the base of a wall take to be renewed, or a board from the cladding on your abode or shed gets damaged and must be replaced. This article shows you iii methods to cut timber.
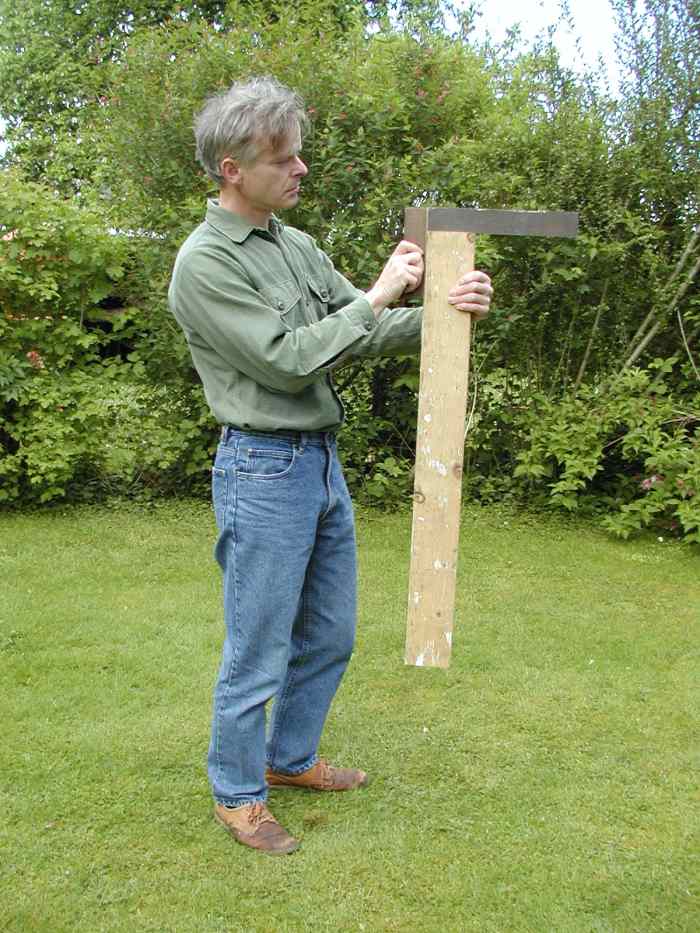
Using a square to mark a ninety degree line as a guide for cut.
© Eugene Brennan
How Practice You Cut Wood at an Angle?
- Marking and cut by eye without a guide. This is non terribly accurate, but information technology'due south ok if measurements and squareness aren't critical.
- Use a miter box. This guides the saw and gives ameliorate results. Even so, you can only make 45- and ninety-degree cuts.
- Use a miter saw. This is the most accurate method of cutting lengths of timber at any angle. Miter saws are besides called "chop saws".
Note: 'Miter' is spelled 'mitre' in British English
Method 1: Mark and Cut Past Eye Without a Guide
The nigh bones method of cutting timber is to just marker it and cut by eye. For basic work where accurateness isn't of import, this is quite adequate. However, unless you have a good eye and have go skilled from years of do, the results are variable, and beginners will finish upwards with kleptomaniacal cuts on the end of timber.
Footstep ane. First Mark the Dimensions on the Timber
Use a sharpened pencil to produce a thin marker line on the wood. Hold the record close to one of the edges and marker the required dimension.
Notation: If you buy lumber from a store, the stop will likely exist a xc-degree cut, but check it beforehand with your carpenters square. If it isn't, initially follow steps 2 to 4 of the marker out and cut instructions below to remove a small section at the end of the timber (continue nearly 1/2 inch in from the edge). In one case this is done, you lot can proceed to measure out, mark and cut the required length.
First check the stop of the timber is square
© Eugene Brennan
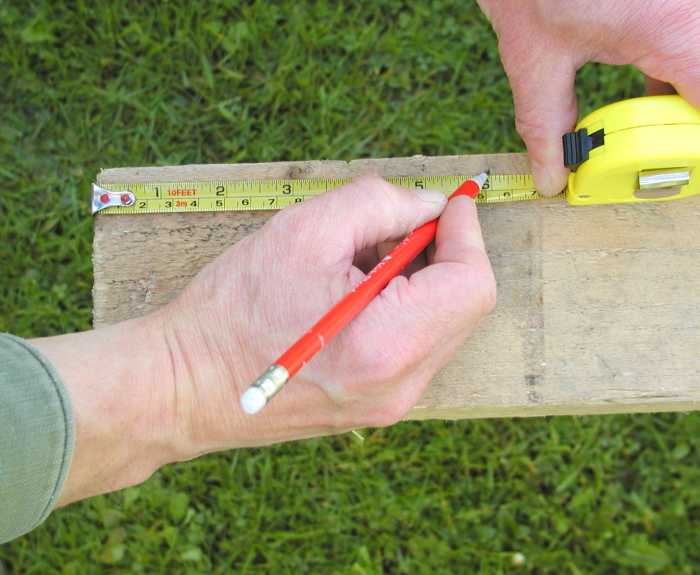
Mark the required measurement on the timber with a short pencil tick
© Eugene Brennan
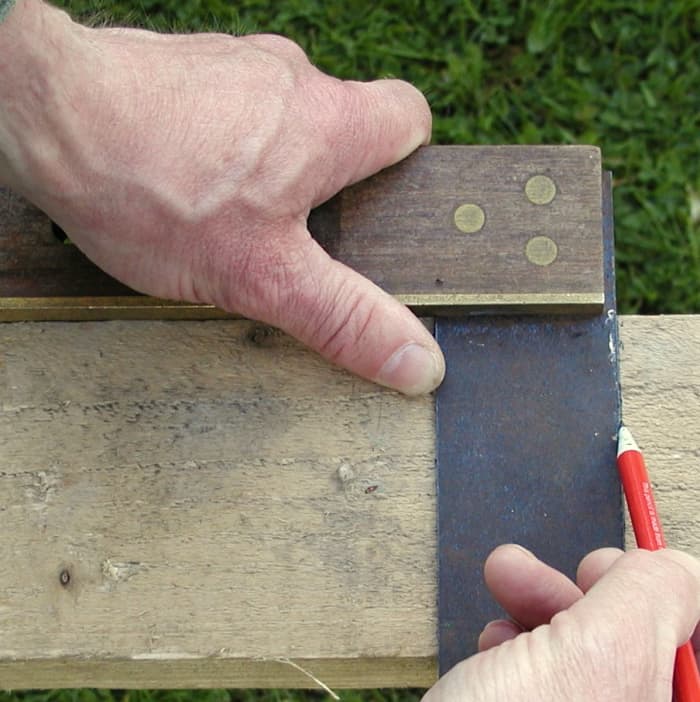
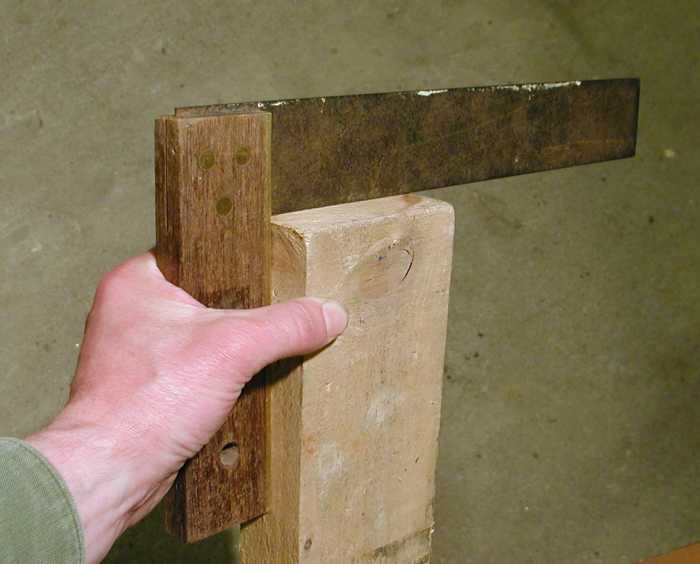
Step ii. Utilise a Carpenters Foursquare to Mark Top Side
A carpenters square allows you to make a right-angled mark across the timber. You tin besides use an engineers square or a triangle (set square in U.k. English). Concur the "stock" or handle of the foursquare tightly against the wood while marking. Ideally, yous should position the tip of the pencil on the mark y'all made initially when measuring, and slide the square so that it butts confronting the tip, then marking along the square.

Use a square to produce a right angled pencil line guide
© Eugene Brennan
Footstep iii. Marking the Two Vertical Sides
Continue to mark the front and rear vertical sides of the timber.
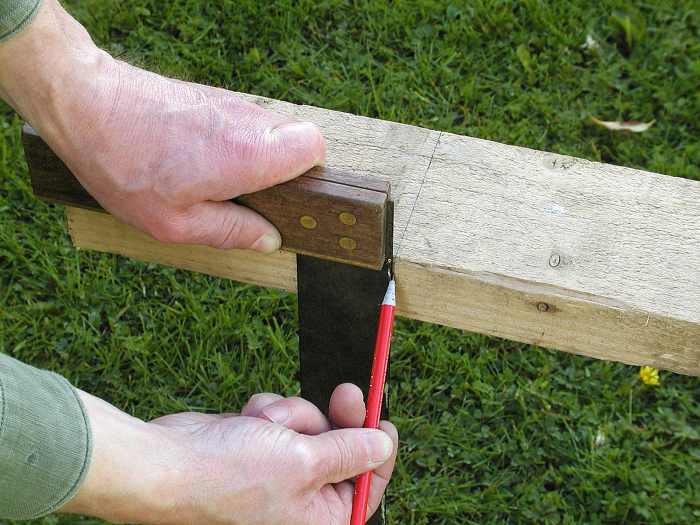
Mark a guide line on both the vertical sides
© Eugene Brennan
Pace 4. Hold the Wood Securely and Cut With a Paw Saw
If you accept a vice, use this to hold the wood securely while sawing, alternatively use your knee and a stool, depression table, Blackness and Decker Workmate or whatever.
Use the pencil lines on the vertical surfaces of the timber as guides while sawing and endeavour to proceed the saw bract straight.
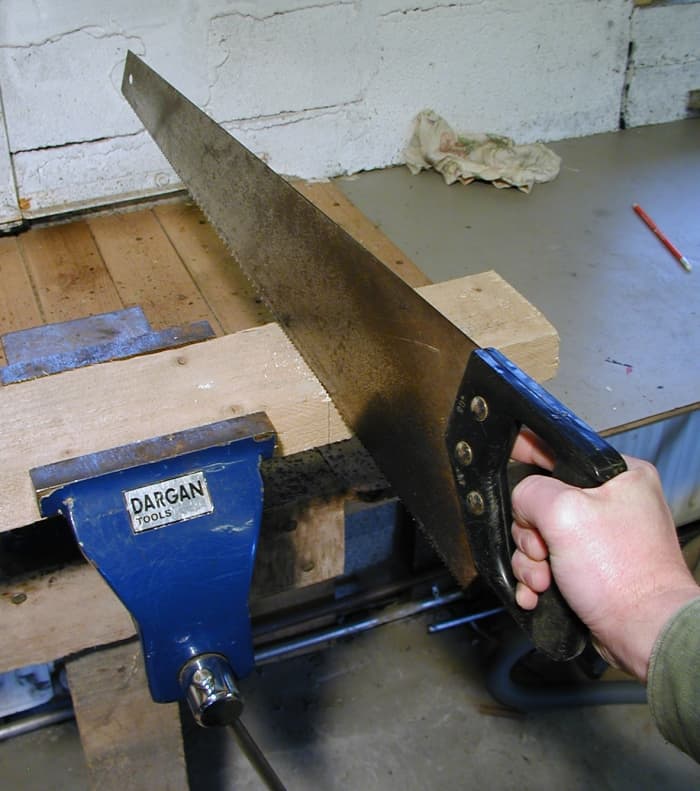
Concord the timber securely in a vice
© Eugene Brennan
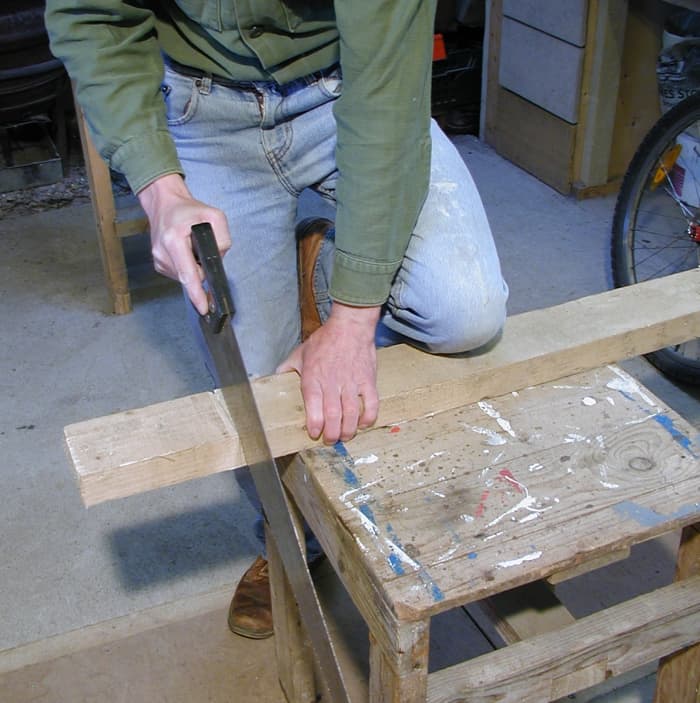
You can as well utilize your genu to concord information technology
© Eugene Brennan
Continue your thumb out of the way in case the saw slips!
© Eugene Brennan
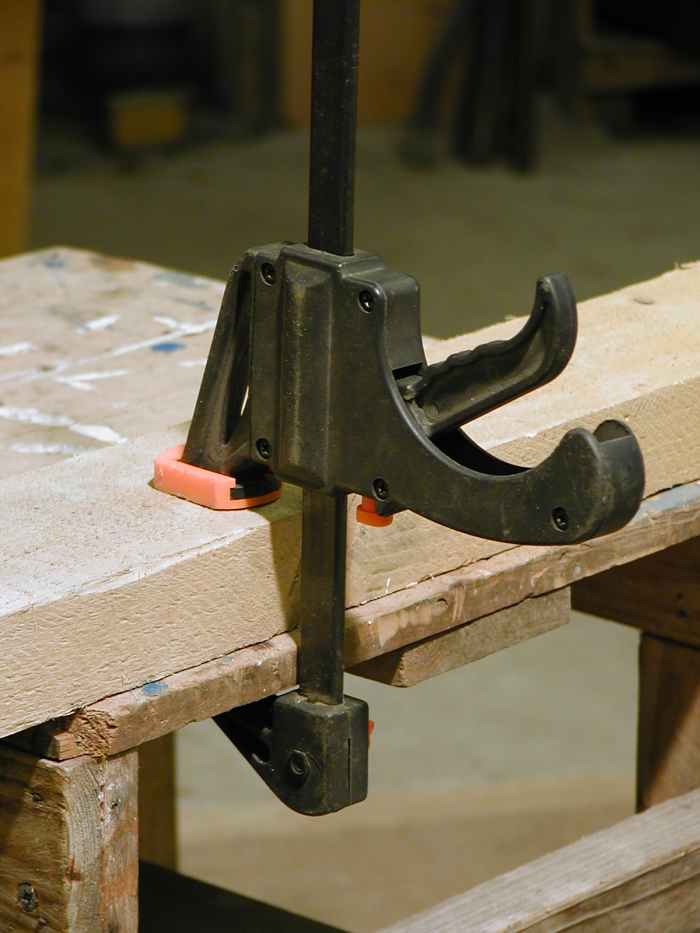
Quick release clamps are useful for property timber
© Eugene Brennan
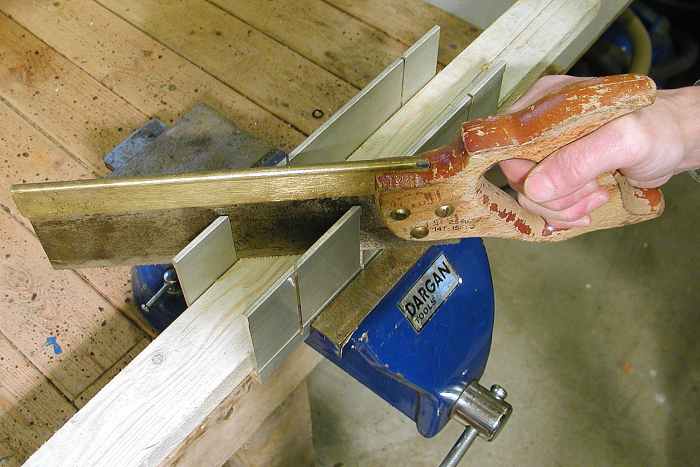
Method 2: Using a Miter Box
This gives improved accuracy when cut. A miter box has slots in its vertical sides which deed equally guides and prevent the bract of a saw from sloping from the vertical. Metal, wood and plastic versions are available. Some need to be held in a vise while others take a "hook" or raised edge on the underside which can be butted up against the edge of a bench.
A miter box enables you to make xc-degree cuts in timber and commonly 45-degree cuts besides.
Note: When cutting timber, cut on the waste side of the line rather than the center line.

Various types of miter boxes
© Eugene Brennan

This miter box has a "lip" or hook on the underside which allows it to exist pushed tightly against the edge of a bench
© Eugene Brennan
Using a Tenon Saw
A tenon saw is shorter than a "normal" hand saw and is less cumbersome to cutting with. It also has smaller teeth (the pitch is greater), which reduces the tendency of the blade to tear or chip the ends of forest fibers whilst cutting. Thirdly the rigid spine of the saw stops the blade from curving and warping too much while cut. All this helps to give better results, which is of import if you are making furniture or other stuff where accurateness and finish are important.
Kerf of a Saw
When cut, position the blade and teeth of the saw so that you cut on the waste matter side of the pencil line rather than cut along the center of the line. The kerf or width of the saw cutting tin produce "gaps" if you lot are cutting joints or doing other fine piece of work. The slight error in length due to the kerf of the saw when cutting on the heart of the pencil line, can accumulate and crusade a greater error (e.g. if several pieces are cut to size and placed side by side).
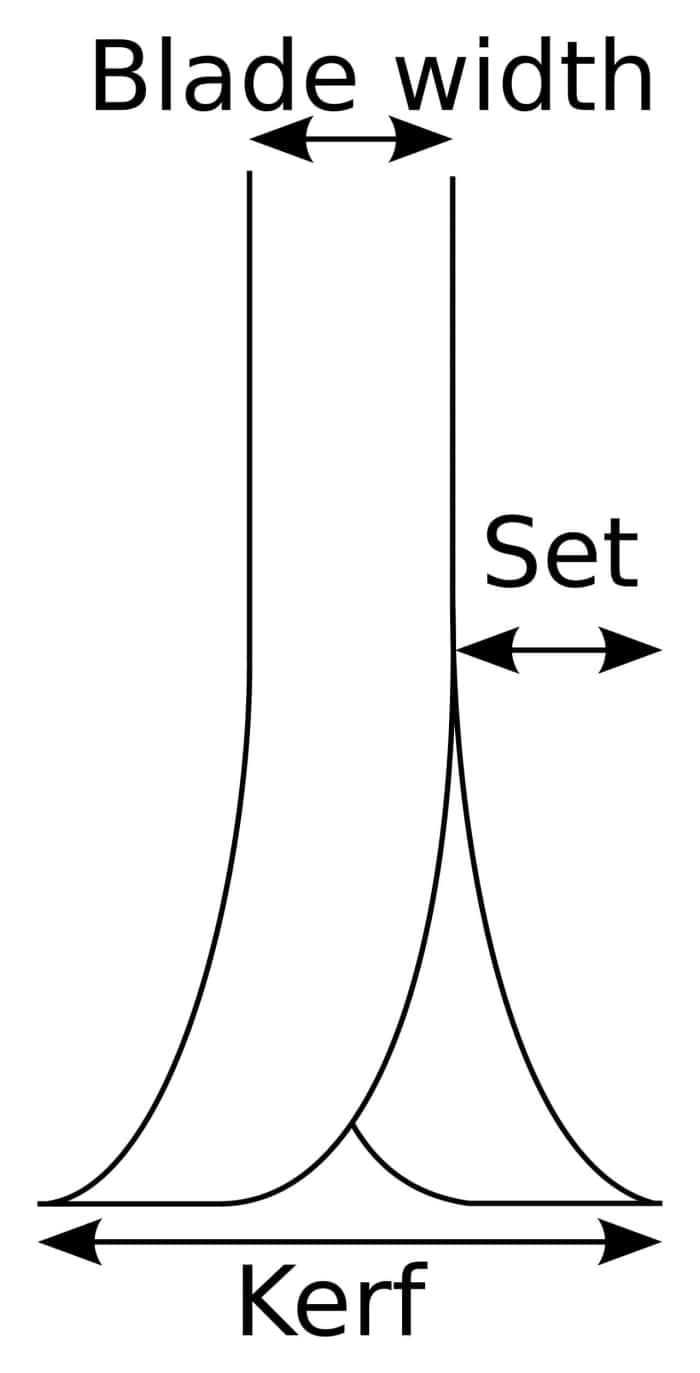
Kerf of a saw. The diverging teeth cut a slot in timber, wider than the thickness of the blade, so the blade doesn't bind.
Ludraman, public domain image via Wiktionary
The slots in metallic miter boxes don't vesture abroad every bit quick from contact with the teeth of a saw
© Eugene Brennan
A miter box and tenon saw produced these results
© Eugene Brennan
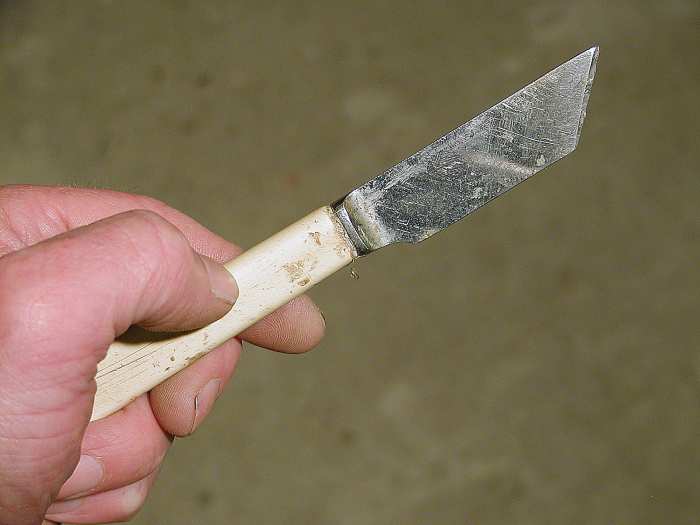
Making and Using a Marking Knife
A pencil is fine for rough work, notwithstanding, a marker knife never gets blunt and produces a fine line, allowing you to produce more accurate results when cutting joints. You can make one by cutting a 45-degree bending on an old dinner pocketknife with an angle grinder and then sharpening it. You could utilize a Stanley knife, however, the reward of a long-bladed, flexible knife is that it tin can reach into tight spaces. (This knife also comes in handy for spreading silicone sealant and putty!)
A sharpened dinner knife used for mark timber
© Eugene Brennan
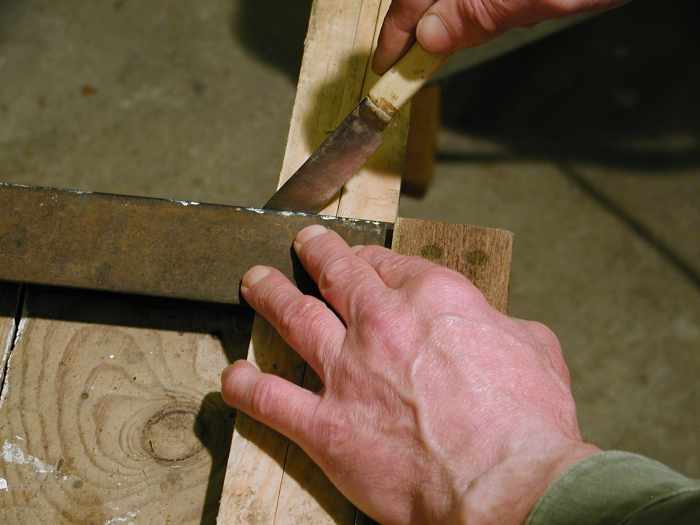
Using a marking knife to marker a section of timber.
© Eugene Brennan
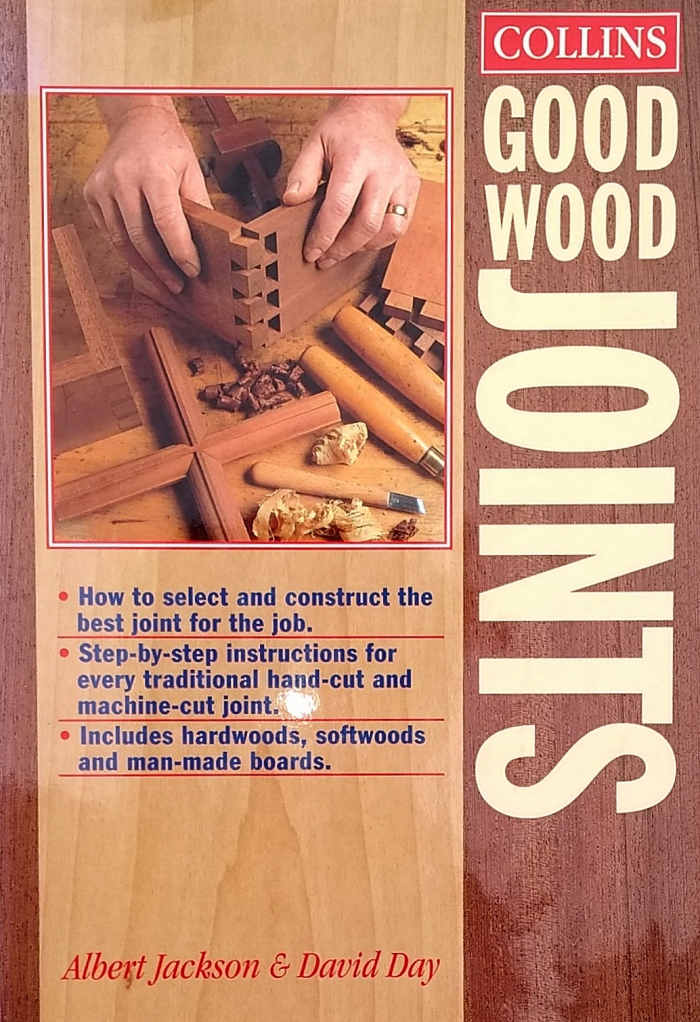
Recommended Books
Skillful Woods Joints by Albert Jackson and David Day, published by Collins is an excellent reference source, with articulate, pace-by-step, colourful illustrations showing how to cut all the virtually common woods joints and those used less often. It too has a thorough index of thumbnails photos, detailing which joint should exist used for any particular application. A chapter in the book is dedicated to the type of hand and power tools required for cut joints. If you alive in the UK or Ireland, you can buy the book on the Amazon UK website.
How to Cutting Angles on the Ends of Timber
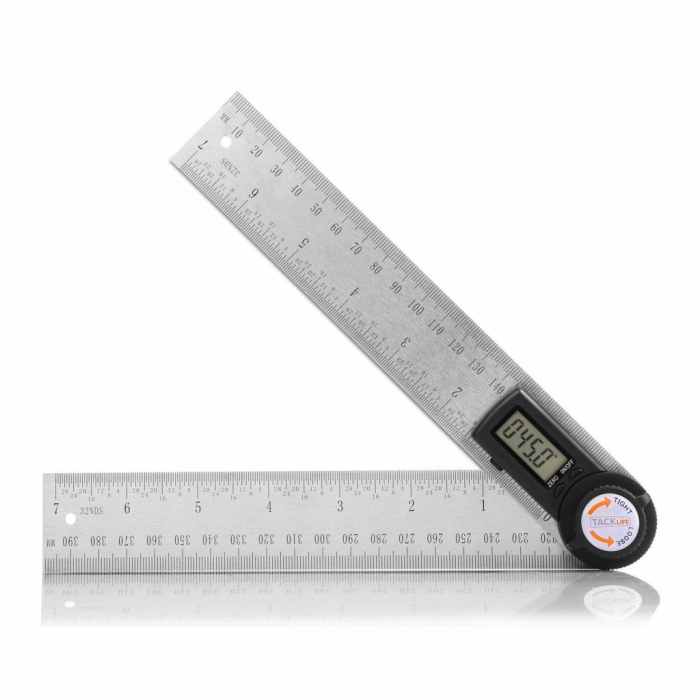
You lot can merely cut the ends of timber square (i.due east. at xc degrees) or 45 degrees using a mitre box. If you need to cutting a dissimilar bending, the simplest solution is to utilize a protractor or a digital angle finder like this one from Amazon. These are useful for measuring an angle betwixt ii sides of timber or other cloth or marking an angle before cut. An angle finder can also be used as a bevel approximate for transferring angles due east.1000. when marking the ends of rafters before cutting. The rules are graduated in inches and centimetres and angles tin can exist measured to 0.1 degrees.
Use an angle finder in the same way every bit a square, described above, for marking the lines of a cutting. Then marker the meridian with the bending finder, describe lines down both sides using a square, then join the ends of the dropped lines on the underside.
The quickest and virtually accurate way however to cut angles is to use a miter saw every bit we'll detect next.
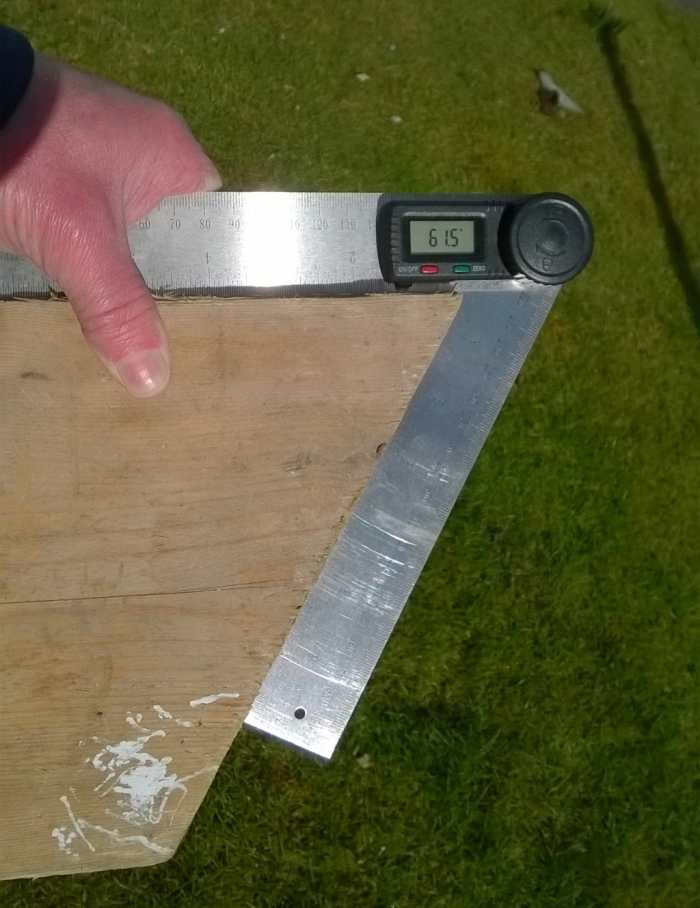
An angle finder can exist used to measure out cut timber, and also equally a bevel gauge to transfer angles when information technology'south necessary to cut more pieces.
© Eugene Brennan
Method 3: Using a Miter Saw
A miter or chop saw is a ability saw designed to produce rapid and accurate 90-degree and angled (mitered) cuts. It's a virtually essential tool when framing, i.e. building stud walls. A bones saw will cut timber upwards to 4 x 2 in size, but a sliding miter saw has a cutting head which slides on a rail, assuasive timber up to 9 x 3 to be cutting without requiring a huge diameter disk.
Blades are available for miter saws with a varying number of teeth. Coarse-toothed blades cut rapidly through timber and are ideal for structural work. Blades with lots of fine teeth are slower at cutting but give cleaner results with less splintering, important when cut architrave, shelving, baseboard (skirting).
It's usually possible to calibrate a saw past way of adjusting chow screws to ensure that the saw actually does give a foursquare cut. You tin can check your cuts with a carpenter'southward square to see if the saw is cutting accurately and make adjustments equally necessary.
The kerf, which y'all'll think is the width of the saw cut, is normally wider, typically 2 or 3 mm (one/viii") for a miter saw blade than it is for a hand saw. So it's more than important to cut on the waste side of your pencil line to avoid inaccuracy.
Alarm
Similar whatsoever ability tool, a miter saw tin can exist dangerous. Follow these tips to reduce the take chances of injury while using a miter saw.
- Make sure the baby-sit on the saw is operating correctly and covers the blade when the cutting caput of the saw is returned to its residuum position
- Concur timber securely against the dorsum fence of the saw while cutting, and ensure that long lengths of timber are adequately supported and then that they don't overbalance the saw or rise up and striking the blade. Usually, clamps are provided on the saw for holding timber in place while cutting
- Don't work with power tools if yous are tired. Poor concentration can cause accidents
- Don't use a blade with blunt teeth or teeth which have lost their tungsten carbide tips. A edgeless blade can snag in timber causing an accident. It likewise gives a ragged, splintered cutting on the edges of timber.
- Don't work in wet weather condition
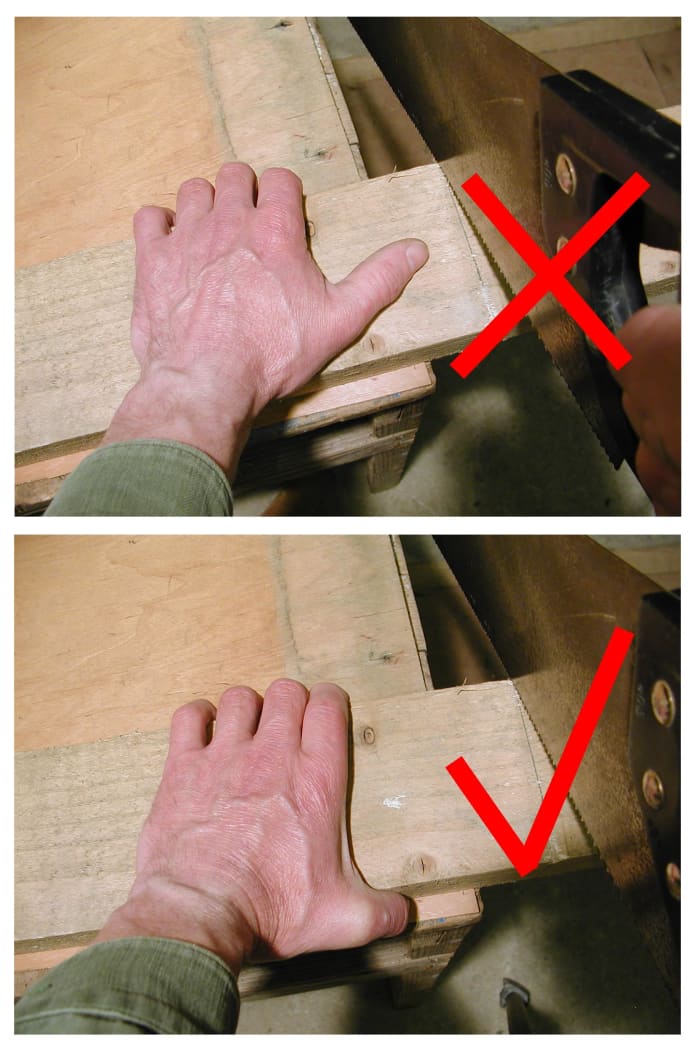
- Proceed your hand clear of the bract while cutting. You might lose fingers!
- E'er wearable safety spectacles in example you hitting knots or nails/screws in waste timber. If yous are doing lots of cutting, wearable earmuffs or plugs and a grit mask
Steps to Cut With a Miter Saw
- With power off, fix up the saw on a bench, defended saw stand or the ground.
- Release lock screws that agree the slide rail, adaptable table and the cutting caput.
- Support long lengths of timber on a roller stand, bench, step ladder, blocks etc to keep them at the same pinnacle as the miter saw table.
- Measure timber and place a short pencil mark on the edge.
- Turn the saw table to the desired cut angle. The angle indicated on the miter scale is from a reference line passing through the plane of the cutting blade, so 0º gives a square or 90º cut on the end of timber.
- Position the length of timber on the table and so that information technology butts up against the fence.
- Lower the bract without squeezing the trigger switch and adjust the timber so that the blade coincides with the pencil mark.
- Tighten clamps onto the timber.
- Power on your saw and squeeze the trigger. Permit the blade to reach full speed and lower the bract onto the timber. Don't force the blade into the woods, you'll know past the sound of the motor whether it's struggling to cutting. If you take a sliding miter saw, cut downwards fully into the front of the timber, then push the bract back towards the dorsum of the fence, again cutting at the rate the saw can handle.
Tip:
For more than accurate results, cut with the left edge of a tooth but to the right of the pencil mark. Since the kerf of a bract is a couple of mm wide, this ensures that the length of the cut section will exist more authentic. If you cut on the center line, your timber will be slightly shorter than measured.
Calibrating a Miter Saw
For general structure work, information technology's usually not an issue, however if you need to make lots of authentic square or angled cuts when making article of furniture, shelves etc, it's a good idea to calibrate a saw start so that the scales indicate angles correctly. It may exist possible to adjust the arrow on the miter calibration past loosening a screw and turning the arrow. A limit screw is ofttimes included on the cutting caput which can be adapted so that the head tin be positioned quickly to give square beveled cuts.
Adjustment procedure
For miter cuts, adjust the tabular array to 0º. Cut a department of timber and check the cutting end with a carpenter's foursquare. If the result is off, adapt the tabular array and cut again. Keep adjusting the table until you're satisfied with the results. Accommodate the arrow if this is possible and so it points to 0º.
Repeat the procedure for askew cuts (cuts with the blade at a variable bending to the plane of the saw table) with the scale set to 0º. The bevel scale is ordinarily at the back of the saw where the cut head pivots about the sliding runway. There may be a limit spiral to set the end of travel of the cut head, so one time you're happy that the saw is cutting at 90º, turn this screw so that it'south tight against the head. If the scale arrow tin exist moved, turn this also so that it indicates 0º.

A mitre saw can make 90 degree square, and angled (mitred) cuts in timber.
© Eugene Brennan
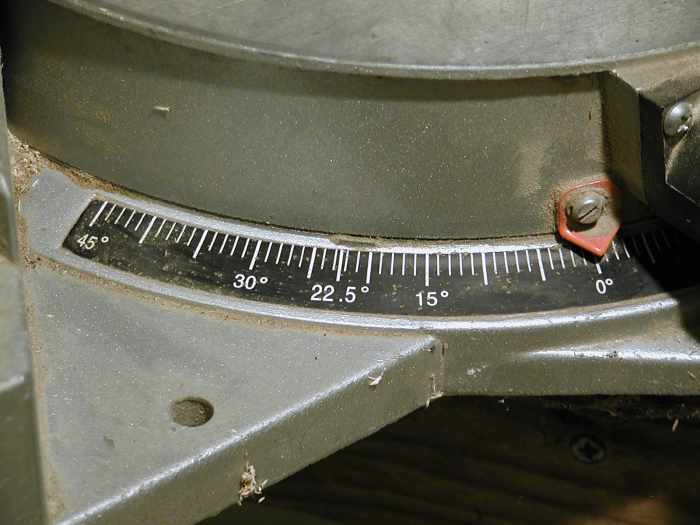
This scale indicates the miter angle. 0 degrees is for cut correct angles. The tabular array can be turned to make cuts upwardly to 45 degrees
© Eugene Brennan

Fine pitch blades are available which give a cleaner cut when cutting e.1000. baseboard (skirting) and architrave. A coarse tooth blade is acceptable for cutting structural timber.
© Eugene Brennan
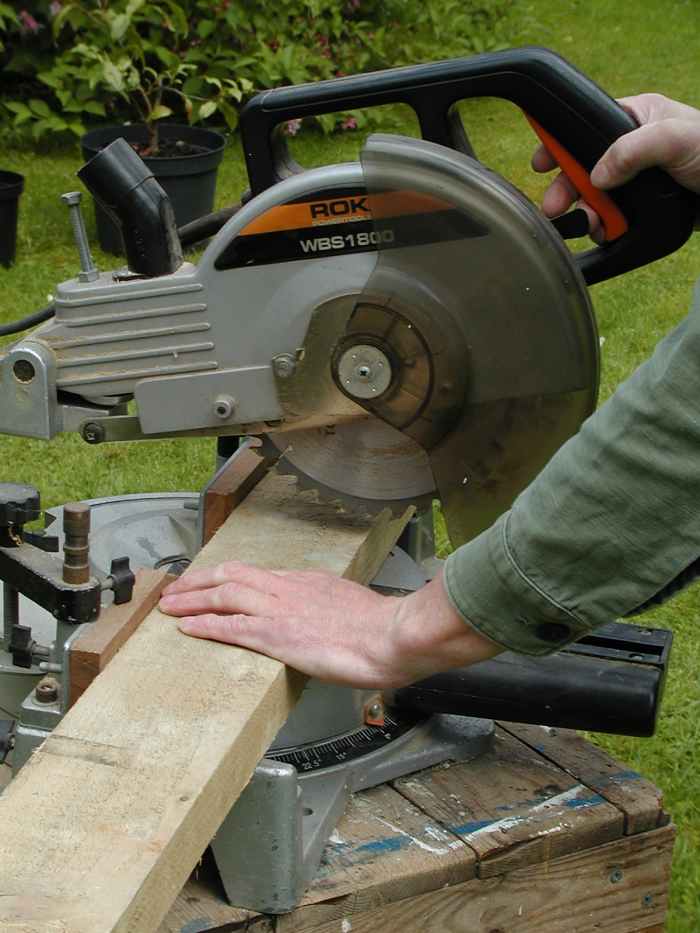
Cutting with a miter saw. The baby-sit retracts when cut and should return when you enhance the cut caput
© Eugene Brennan
Mmmmmmm Square!
A miter saw gives an accurate cutting if it'due south setup properly
© Eugene Brennan
If you plan to cut a lot of lumber, one of these miter saws is practically essential. This 12" Dewalt Sliding Compound Miter Saw (model DWS779) from Amazon will exercise everything you demand. It'due south a corded ability saw with a 120 volt, 15 amp motor and is suitable for cutting rough or planed lumber up ii x 14 at ninety degrees and 2 x 12 at 45 degrees. Another option is the cheaper Metabo HPT C10FCG 10 inch Compound Miter Saw. (This is a cordless, battery-powered, non-sliding saw, express to cut approximately 2 ten 5 or 3 x 3 at 90 degrees).
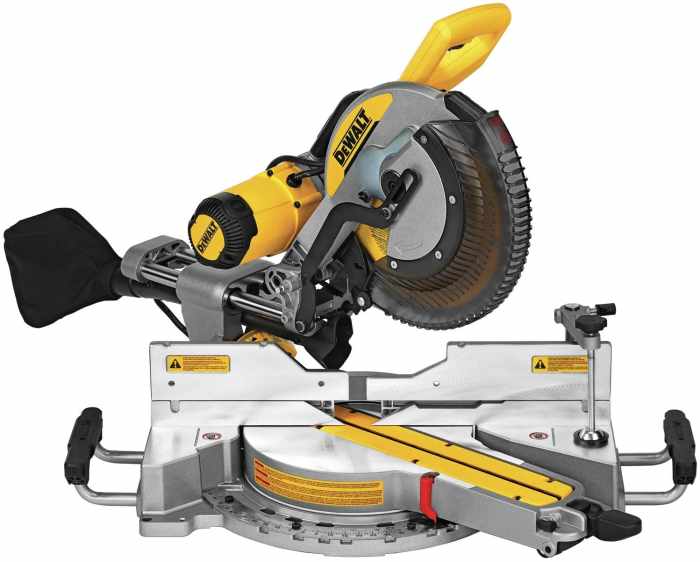
Mitre saw
Amazon
A miter saw is virtually essential for rapidly producing authentic square cuts when framing (building timber frame walls)
© Eugene Brennan

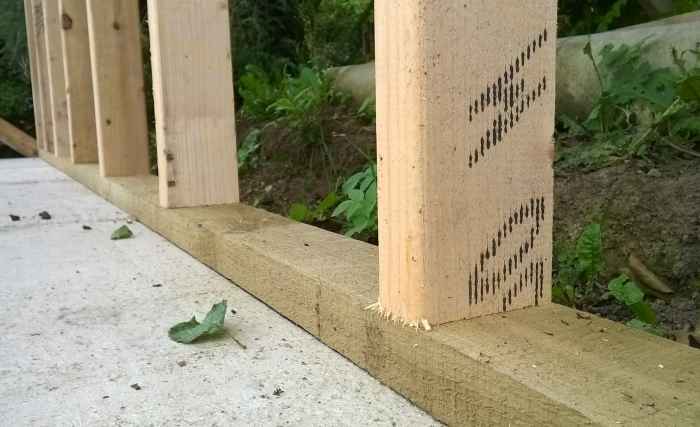
I used a miter saw to cutting all this timber to size.
© Eugene Brennan
Tips for Cutting Wood Using Manus Saws and Power Saws
- Keep your hand saws clean. Remove whatsoever rust with wire wool or sandpaper. Lubricate with light oil, Vaseline petroleum jelly or a candle.
- Go along pencils sharp then that they produce a fine mark line and timber tin can be cut more accurately.
- Timber, especially softwood, swells somewhat in damp humid weather conditions, for example if it's indoors in an unheated garage or warehouse. This can result in gaps in floorboards or paneling as it shrinks on drying. If possible permit timber to dry out indoors for a few days before using.
Did You Find This Article Useful?
Was the info in this article useful and instructive? How can I better it? Would you lot similar to ask me whatever questions?
Delight provide some feedback below. Thanks!
References
Jackson, A., & Twenty-four hour period, D. (1993). Collins Complete Diy Manual. HarperCollins.
Disclaimer
Power and hand tools tin can be dangerous. Read and understand all manuals before use and have reasonable precautions including wearing personal protection equipment (PPE) to prevent confronting injury.
This article is accurate and truthful to the best of the author'due south noesis. Content is for informational or entertainment purposes only and does not substitute for personal counsel or professional communication in business, financial, legal, or technical matters.
Questions & Answers
Question: Is there a ameliorate saw to use for cutting at an angle than a Miter saw. Volition the boards will be short?
Respond: You can clench the boards to a table, bench or whatever and use a jigsaw, just the result won't be as good. The blade on a jigsaw will flex somewhat and never give a perfectly square cut, but whether that'southward of import depends on whether the cutting edges will exist exposed and the caste of accurateness you require. I can mark an angled line on a lath using a protractor, covering square or protractor and easily cutting the boards with a hand saw to an accurateness of +- 1 degree of xc degrees, but that's after years of practice! Yous could try this on a scrap and see the results, but of course, if you have a lot of boards to cut on a continuous basis, it wouldn't be practical.
I've never seen them, put possibly miter boxes are available for boards equally wide as six". If not, information technology wouldn't be difficult to make upward i from timber as a jig and use it as a guide for cutting the boards. And then you could use a hand saw, or reciprocating power saw to cut them.
Edit: Look up "Talking Tools," my Facebook group. There are lots of experts at that place who might have further suggestions.
Question: I need to cutting 2X6 boards with angles at the acme. The boards are cut downward to 8 and 12-inch pieces. Film the tops looking similar a roof. This is for crafting. Will a miter saw work for a 6-inch wide lath?
Answer: Yeah, a miter saw will cut boards this thick and wide. Yet considering they're so short, it could be difficult to hold them by mitt and push them dorsum against the argue of the saw. So make sure you lot use the clamp on the saw, if fitted, to concur down the boards when cut, or at to the lowest degree a corner of them. If the bract on a saw is blunt, it can potentially snag on a board and pull information technology up into the blade, which could startle yous and cause an blow, so your mitt needs to be well articulate. When cutting long lengths of timber, this is less likely to happen because of the weight of the lath. Lower the bract slowly and advance slowly to lessen the chances of this happening.
Note: If the saw has mounting holes, it's a good thought to screw it to a bench, at least temporarily, for stability, so that it doesn't tip over or slide when you're cutting.
© 2014 Eugene Brennan
Eugene Brennan (author) from Ireland on June 26, 2020:
Hi Robert,
You lot can use a protractor which yous can buy in a school supplies store to mark the angle. Alternatively you can use an electronic angle finder equally described in the article. Mark the widest section of the timber top and bottom (4" or 6" surface). Then draw correct angles downwardly the 2" side and cut by mitt. The problem with a mitre saw is that it may limit mitre (angled) cuts to a minimum of45 degrees. If yous desire to cutting at 30 degrees to a long side, the best affair would be to clench a piece of timber onto the 2 ten 4 or 2 x 6 at a thirty degree angle to act as a guide and apply a round saw to brand the cuts. Make sure you support the timber adequately while cutting. If the thirty degree bending is with respect to a line drawn at correct angles to the long side of a timber, then you can just gear up the mitre saw to 30 degrees and cut.
robert 50 reed sr on June 26, 2020:
how practice you cutting a 2 by 4 or 2by vi at a 30 caste cutting to be direct on the basis or saw cadet or picnic table? what type square practice I demand or what type toll . I am building both
Frank on June 24, 2020:
Zero info on the vital part nearly cutting the angle by manus
Leigh on September 14, 2016:
TERRIFIC DETAIL FOR A NOVICE!
Eugene Brennan (writer) from Ireland on January 20, 2015:
Thank you Mazlan! It's probably the way to get now. Google seems to like articles with lots of photos and some of my hubs which accept a high paradigm count, and not so much text weren't affected by the Panda update.
Mazlan A from Malaysia on January 20, 2015:
Yes, this article is useful and instructive, with lots of photos to guide united states of america through. A well-deserved HOTD honor and a proficient start to your 2015. Well washed. Possibly I should copy your template :)
Diane Ziomek from Alberta, Canada on January 20, 2015:
Thanks. That is a good matter to know. I am going to have to go shopping for more tools soon. :)
Eugene Brennan (author) from Ireland on January 20, 2015:
Thanks Diane! If you make up one's mind to use metallic cladding for the roof of the fauna housing, thin angle grinding disks are more effective for cutting this type of fabric than standard types.
Diane Ziomek from Alberta, Canada on January 19, 2015:
This is an splendid tutorial, as I am starting to do more of my ain building. I have done some basic loom frames, just would like to make them prettier. I am too planning on edifice some fauna housing this summer, and then this is practiced to have for a reference. Thank yous!
Eugene Brennan (author) from Republic of ireland on Jan 19, 2015:
Thanks for the vote of approval!
Mitre saws do may life easier, especially for framing and for cutting roof timbers. Their cousin, the metal cutoff saw, is bully if box, angle or flat lengths of steel demand to be cutting.
The saw in the photo is a ten inch model, notwithstanding I have added removable hardwood spacers so that I can use it with 8 inch blades.
Liz Elias from Oakley, CA on January 19, 2015:
Congratulations on HOTD! Well done, with splendid photos!
My hubby and I have done a lot of this sort of work around our home, every bit well every bit formerly running a pocket-sized handyman remodel/repair service. In years before I met him, he was a full general contractor. Nosotros accept a shop full of all these tools and more.
So many people are clueless about handling tools and cutting; non knowing to let for the saw kerf, which in fine stop work, tin make a huge deviation. It is somewhat less critical in rough framing, but nevertheless, information technology is good to accept good habits even there. It drives is Nuts these days to meet guys using chain saws for framing!
My ain miter saw (chop saw), is the blazon with the blade that lowers down and cuts straight through, not a sliding type. It is stored in the locked-downwardly position.
Voted up, interesting and useful.
Eugene Brennan (author) from Ireland on January xix, 2015:
Great, thanks for that! Power tools aren't dangerous one time yous remember where you've put your hands and feet, and keep your head out of the way!
Patsy Bong Hobson from zone 6a, Southeast Missouri, USA on January xix, 2015:
Wow, this is a slap-up hub. And may I say, information technology makes working with ability tools less intimidating to folks unfamiliar with shop tools. Voted upwardly IU, tweet, pin.
Eugene Brennan (author) from Ireland on January 19, 2015:
Thanks Elsie. Glad you liked it!
Elsie Hagley from New Zealand on Jan 19, 2015:
Congratulations for HOTD, you deserve information technology, explained so well.
Just I all the same think I will leave information technology to the experts as I have a problem with my shoulder and somehow I tin can't hold on to whatsoever moving item, never mind old body immature heart.
Eugene Brennan (writer) from Ireland on January 19, 2015:
Yeah, those dreaded borrowers, they won't buy their ain tools and lose $.25 from yours! I know the feeling - Cheers for the comments!
DreamerMeg from Northern Ireland on January 19, 2015:
Mitre saws are only useful when no 1 else borrows them and loses pieces! As you can tell, I did take i and I will get another when I take time to try out a new hobby again. Useful hub, thanks.
RoadMonkey on Jan 19, 2015:
I got myself a mitre saw a few years ago, and then I could brand my own movie frames. They are very useful.
Eugene Brennan (author) from Ireland on January 19, 2015:
Thanks aesta1 , skillful luck with the projects in your cottage!
Lamentable about the quality of the video, I need to make a new 1 with my smartphone when I get a chance.
Eugene Brennan (writer) from Ireland on January 19, 2015:
Thank you RTalloni! , much obliged for the comments!
Mary Norton from Ontario, Canada on January nineteen, 2015:
Congrats on your HOTD. This volition be useful come summer when nosotros go to the cottage and start having projects.
RTalloni on January 19, 2015:
Congrats on your Hub of the Day award for this tutorial with useful data on saws and other tools. This is a very useful post for people interested in learning to cut wood correctly. Your quondam foursquare is neat to see.
Eugene Brennan (author) from Republic of ireland on January nineteen, 2015:
Thanks for the comments Emily , and the anecdote!......
Many years ago, I made a bench for my desktop computer which was destined for an attic room. I had stupidly guesstimated the width of the doorway instead of measuring information technology, and yes you guessed information technology, the finished bench was too broad to fit through the door! I was practicing making mortice and tenon joints and of course these were glued together. Luckily I discovered my error in time before the gum dried and was able to do some disassembling, and reassembling inside the attic. If I e'er remove information technology, its going to accept to exist cut up!
Emily Tack from USA on January xix, 2015:
Great article, and wish I had written it first! Kidding...
A few years agone, I decided to make my own bed. I really should have taken photos forth the way, of my project, but I was determined to go it finished as fast as I could.
Information technology only took me almost iii days, working on it in the evenings, after I got dwelling from our shop. I measured the two mattresses I intended to use, and left myself some leeway, for bedding. On a mission, I fabricated a double-decker, full-size bed, constructed out of 4x4's and 2x4'south; complete with a ladder to the 2d deck. I thought information technology would be bully, when the grandchildren stayed over - it was, likewise!
Later on my creative frenzy was finished, and my lovely bed was ready to sleep in, it "dawned on me" that I could have been finished with my projection in a fraction of the time it took, if I had used an electric miter saw. I had fabricated it with my foursquare, my wooden miter box, my old hand-held power saw, and my ancient hand saw, and my ability drill. What was I thinking?
The finished production was delightful, and I really enjoyed sleeping in it; convinced it was the about comfy bed in which I had ever slept.
And so, I remarried, later on being a widow for over 10 years, and moved into my hubby'south abode. One of my grown children and their family unit moved into my room, at my old house, and had beds of their own. My love bed had to go. It was and so big, that they could not get information technology out of my old sleeping accommodation, and then they dismantled information technology. I felt bereft of an old friend; it was a bang-up bed!
Presently after I congenital the bed, I bought myself an electrical miter saw. What a joy it was to utilize! I should accept done that before I started on the bed. The next fourth dimension I take on a big project, it volition virtually definitely come up into play.
Eugene Brennan (author) from Ireland on Jan 19, 2015:
Thank you Dennis!
It was the same for me, learning by trial and fault over the last thirty years or so. Wood is a wonderful material to work with, planing and etching especially, is very satisfying. I think craftwork, whatsoever class it takes, alongside practice, is great therapy for trunk and mind.
Dennis L. Page from New York/Pennsylvania border on January 19, 2015:
When I began woodworking several decades ago, it was by trial and error. I probably would accept saved a lot of money and wood if I had your wonderful article and pictorial guide way back then. This is a keen post for those looking to become into the joy of woodworking.
Judy Specht from California on May 16, 2014:
Love our miter saw. Nosotros struggled for years with a miter box or cutting by hand. Dainty instructions.
Source: https://dengarden.com/home-improvement/How-to-Cut-Wood-Square-by-Hand-or-With-a-Miter-Saw
0 Response to "How To Cut A Triangle Out Of Wood"
Post a Comment